- How to: Set up a GlassFish Cluster
- How to: Apache Server as a Load Balancer for your GlassFish Cluster
How to: Apache Server as a Load Balancer for your GlassFish Cluster
Setting up a GlassFish server cluster with an Apache HTTP server as a load balancer involves several steps:
- Configuring GlassFish for clustering
- Setting up the Apache HTTP Server as a load balancer
- Enabling sticky sessions for session persistence
We’ll assume that you’ve already configured GlassFish for clustering. If you haven’t done so, you can follow our guide on how to set up a GlassFish cluster to prepare your own GlassFish cluster. After you’ve prepared it, this tutorial will guide you to configure Apache HTTP Server as a load balancer with sticky sessions.
Step 1: Install Apache HTTP Server
Install Apache HTTP Server on a machine that will act as the load balancer. This should be a separate machine from machines that run GlassFish cluster instances, mainly for security reasons. While your cluster should be accessible through the Apache server, GlassFish cluster instances shouldn’t be accessible publicly. Therefore, you should configure your firewall or networking rules to only allow access to GlassFish instances only from the Apache server.
On Apt-based systems, like Ubuntu or Debian, you can install Apache HTTP Server from the system repository with the following commands:
sudo apt update
sudo apt install apache2
Step 2: Enable Proxy Modules in Apache HTTP Server
Enable the necessary proxy modules (proxy, proxy_http, proxy_balancer, and lbmethod_byrequests modules) in Apache server:
sudo a2enmod proxy
sudo a2enmod proxy_http
sudo a2enmod proxy_balancer
sudo a2enmod lbmethod_byrequests
Step 3: Configure the load balancer mechanism
Edit the Apache configuration file (usually located at /etc/apache2/sites-available/000-default.conf) and add the following configuration:
<VirtualHost *:80>
  # Basic server configuration, use appropriate values according to your set up
  ServerAdmin webmaster@localhost
  ServerName yourdomain.com

  # access and error log files
  ErrorLog ${APACHE_LOG_DIR}/error.log
  CustomLog ${APACHE_LOG_DIR}/access.log combined

  # Forward requests through the load balancer named "balancer://glassfishcluster/"
  # Uses the JSESSIONID cookie to stick the sesstion to an appropriate GlassFish instance
  ProxyPass / balancer://glassfishcluster/ stickysession=JSESSIONID failontimeout=On
  ProxyPassReverse / balancer://glassfishcluster/

  # Configuration of the load balancer and GlassFish instances connected to it
  <Proxy balancer://glassfishcluster>
    ProxySet lbmethod=byrequests

    BalancerMember http://glassfish1:28080 route=instance1 timeout=10 retry=60
    BalancerMember http://glassfish2:28080 route=remoteInstance timeout=10 retry=60

    # Add more BalancerMembers for additional GlassFish instances

  </Proxy>
</VirtualHost>
Replace the following according to your actual setup:
yourdomain.com– the domain name of your application (the DNS record should point to the Apache server)glassfish1– hostname or IP address of your GlassFish instance with nameinstance1glassfish2– hostname or IP address of your GlassFish instance with nameremoteInstanceinstance1,remoteInstance– names of your GlassFish instances. If you use different names, adjust them here and make sure that thejvmRoutesystem property on GlassFish instances is set to the same instance name
Note that:
- GlassFish instances must be configured with the jvmRoute system property to add GlassFish instance name to the session cookie
- Values in the
routearguments ofBalancerMembermust be GlassFish instance names matching that member (values set by thejvmRoutesystem property). The value of thejvmRoutesystem property should be defined in the GlassFish cluster configuration to the value of${com.sun.aas.instanceName}to reflect the GlassFish instance name. This value will then be added to the session cookie so that the Apache loadbalancer can match a cookie with the right GlassFish instance. - With the configuration
failontimeout=On, the load balancer waits at most 10 seconds for the request to complete. If it takes longer, it considers the GlassFish instance as unresponsive and fails over to another instance to process the request. This is to consider GlassFish instances that are stuck (e.g. when out of available memory) as inactive. If some requests take more time to complete, either disable this option, or increase thetimeoutarguments on BalancerMember - The example configuration doesn’t contain HTTPS configuration. We strongly recommend using HTTPS for the Apache virtual host in production, signed with an SSL/TLS certificate, and redirect all plain HTTP requests to equivalent HTTPS requests
- If you use a different session cookie name, replace
JSESSIONIDwith your custom cookie name
Step 4: Verify firewall configuration
Verify that:
- Apache server can access the HTTP port of each GlassFish instance (port 28080 by default )
- GlassFish instances should not be accessible from a public network for security reasons, they should only be accessible from the Apache server
Step 5: Restart Apache HTTP Server
Restart Apache to enable the new modules and apply the configuration changes.
On an operating system that uses SystemD services (e.g. Ubuntu):
sudo systemctl restart apache2Step 6: Verify the Sticky Session routing
Test your setup by accessing your application through the Apache load balancer. Verify that sticky sessions are working, ensuring that requests within the same session are directed to the same GlassFish instance and requests without a session are routed to a random instance.
You can use the test cluster application available at https://github.com/OmniFish-EE/clusterjsp/releases:
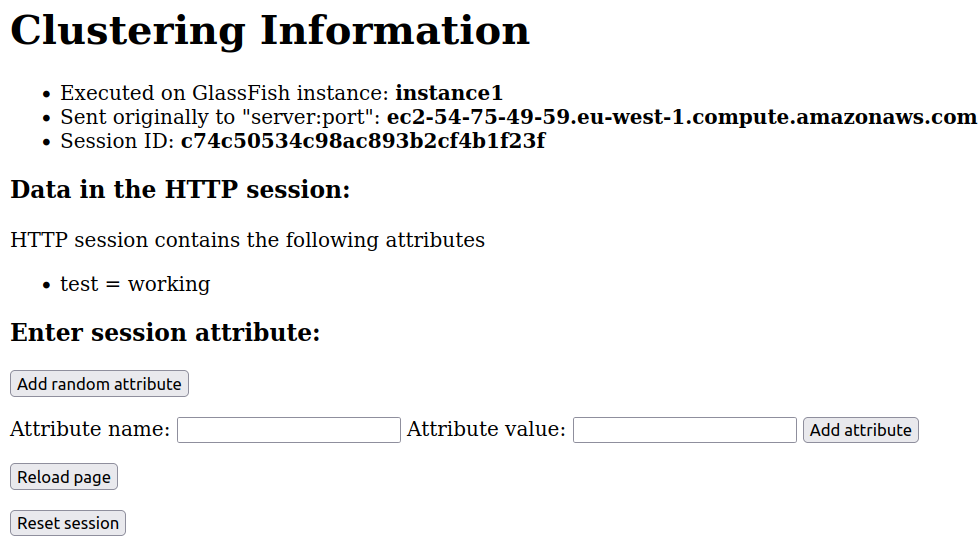
Summary
With these steps, you should have a basic setup of a GlassFish server cluster
- with an Apache HTTP Server acting as a load balancer
- sticky session routing for session persistence across requests
In case of an issue with a GlassFish instance, the load balancer should stop sending requests to that instance and keep using the remaining GlassFish instances in the cluster. Once the GlassFish instance recovers from issues, it will rejoin the load balancer and will start receiving requests again.
You can also rely on this mechanism when you need to restart the cluster; instead of restarting the whole cluster at once, you can restart GlassFish instances one by one. While one of the instances is being restarted, Apache server will continue sending requests to the other instances.